The Favorite Baby Things Post

I wasn’t sure where to pick back up after such a long absence…so I decided to start with something completely unrelated. My favorite baby gear. So here goes!

Also, this is going to be a long post. Brace yourselves…

Angelcare Movement Monitor

This monitor is the sole reason I get any sleep at night. It detects the slightest movement and will send off an alarm if the movement stops (ie: he stops breathing).  Kael sleeps like a rock and I love being able to look at the monitor and see that he is still ok. Plus, it has fancy features like showing you the temperature in the nursery! They even have a new one that has video as well, which I hear is super helpful for the toddler stage when they are constantly getting out of bed.

AC401_eng_fah

Boppy

I don’t use this at all anymore but this was invaluable the first couple of months. Breastfeeding is hard enough to figure out without having to use one arm to hold the baby in the right position as well!

Seventh Generation disposable diapers

We occasionally use disposables- like when we go out of town or when a babysitter will have to change his diaper. Kael blows out of every brand besides this one. More importantly, they don’t have the chemicals that normal disposables have from the chlorine bleaching process. Love love love these!

Munchkin Changing Kit

Almost every time we leave the house, Kael lets a big one loose. And always at the most inconvenient time and place! Rather than lugging my GIANT diaper bag to a place I can change him, I just grab this out of the bag. It has diapers, wipes, baggies, a changing pad, and even an extra outfit…all compacted into a little carrying case. So much easier!

41MaBkglPVL._SL500_AA300_

ERGO

Um, it gives you two free hands. And no back pain. And the baby doesn’t take up 3/4 of the grocery cart in his car seat. ‘Nough said.

Breathable Baby bumper

I refused to put a bumper on Kael’s crib for quite a while. But Kael is very mobile in his crib and always has been from birth. He would work himself into the side of the crib and would wake up crying with an arm and a leg sticking through the rails each night. Then, one night, he woke up with a leg going out through one rail and his foot stuck going back in the crib through another rail. Enough was enough! This bumper is awesome because he can smash his face up against it and still breathe, but he no longer gets stuck in the rails. And let me tell you, I find him with his face smashed up against the bumper quite often!

IKEA Poang chair

I knew before I got pregnant that when I had a baby I wanted a Poang chair for the nursery. Not only is it super comfortable, but Kael really likes the short rocking motion of it. Plus, the armrests are really low on it which is perfect for nursing. Anyone who has used a conventional rocker/glider for nursing knows that it’s a struggle to get the baby’s head to not bang on the armrests constantly!

poang

Cloth diapers/wipes

Love love love cloth diapering! Of course price plays a factor but I also much prefer using cloth to disposable. We use Bummis prefolds with Snappis and Wonder Wraps one-size covers (which are now discontinued, but they were made by GroVia, so their new covers I think should be similar). When we leave the house, I put him in BumGenius Elemental diapers, which are one-size all-in-one diapers- essentially the cloth version of disposables! I love these but I find that they don’t hold quite as much and blow out easier than prefolds (which never blow out using a bikini twist or fan fold). But I do love their convenience and they are still a TON more effective at holding stuff in than disposables. Kael blows out of almost all disposables but 99% of the time cloth diapers will keep it all in. I also don’t like how drying disposables are. I would often change Kael just to find his skin stuck to the mesh of the disposable diaper from wicking all the moisture off his skin. Plus, almost all diaper rashes are from the chemicals in disposable diapers, not from being wet too long. Kael has only had a couple diaper rashes and those were from overnight diapers that stayed wet WAY too long. Which leads me to the next thing…

Fleece liners

When Kael started sleeping longer overnight, we started having issues with how long his wet diapers stayed on his skin. They never leaked, but one morning he woke up with a beast of a diaper rash. I knew you could buy fleece liners to wick the moisture off of the baby’s skin and into the diaper, so I ordered the Bummis fleece liners…just to find that they were way too narrow to use with prefolds and he would still get rashy on the skin around what the liner covered. So, I went to JoAnns, found a big piece of scrap fleece for $1.50, and made 9 huge liners out of it! With one of these on every night over his prefold, we haven’t had another rash issue since.

Burts Bee’s diaper ointment

When Kael did get a diaper rash, this stuff cleared it in a day. It’s 100% natural and it rocks my socks off.

SwaddleMe swaddlers

We tried to swaddle Kael but on night #2 he was having none of this arm restriction stuff. We got quite a few of these swaddlers for showers, so I still used them, I just wrapped the swaddling part around his body under his arms. I found that I really like using these and I still use them every night as a wearable blanket. Now I don’t have to worry about a loose blanket in his crib! Not only do loose blankets constantly come off with all his wiggling, but they pose a risk for suffocation. Plus, since he wears some sort of sleeper or onesie under his swaddler every night, the swaddler itself doesn’t get dirty and can be reused quite a few times before being washed. I like these more than the sleepsacks for this fact, as well as being able to dress him cooler and not have the long sleeves during the summer.

Bath towels

Not a baby item, but if you have a baby that spits up like mine does, it’s a must. Burp cloths just don’t cut it…

bath towels 2

Foam bath

This bath works as a stand alone in a sink or bathtub or can be used inside of an infant/toddler bath. We use ours as an insert and it worked great when he was a newborn to keep his head steady and keep him high enough out of the water that his face wouldn’t get in the water. It also compacts very small and is great to take traveling to use for bathing in a normal bathtub.

I’m sure I missed a million things, so I might have to do a second post sometime in the future. Hope this helps any new moms out there!

Bringing ’em up right

Saturday at Ikea, I found this.

duktig-toolbelt-with-soft-toys-assorted-colors__0114879_PE267837_S4

And I had to get it. I mean, ya gotta start ’em young, right?

Here’s to hoping his/her first word is “hammer.” 🙂

Ode to Cassie

Dear Cassie,

From the very beginning, you have been an angel. Sure, you had your moments…chewing a hole in the wall, running off and eating the neighbor’s garden, tearing open your dog food bag and eating half of it…

DSC08941

But much more than that, you’ve been a true companion and friend.

DSC08796

Your fur had truly magical properties. It managed to find a way to stick to everything in sight, and just when we thought we’d cleaned it all up, we’d find more. It was so thick and warm that you would be outside in 20 degree weather, eating snow and panting.

DSC08935

Everyone that met you loved you. You had the whole neighborhood smitten in your first week home in Missouri, and you did the same to your new neighborhood in Indy.

DSC09000

It took you a little while to warm up to Yoshi and even longer to warm up to Penelope, but they adored you from the very start.

DSC09245

How could they not? You were so very lovable.

DSC09045

We will miss you more than words can express.

Love,

Amy, Chris, Yoshi, and Penelope

Cassidy Grace Roth Vincent (December 10, 1998- January 18, 2011)

Biggest Project to Date…

Once again, it’s been FOREVER since I updated, but this time I have a good excuse! Our new project has been taking more time and energy than previous projects…and a lot more sleep.

Any guesses?

Ok, most of you already know. We are having a BABY!

In spite of that, we actually have gotten quite a bit done around the house. I did sleep the first 2 months of the pregnancy completely away- my schedule looked something like this: wake up, go to work, come home from work and go straight to bed, wake up, go to work….

But past that, we renovated our kitchen- cabinets and countertops, started on the nursery, and went on a babymoon cruise to the Bahamas!

Now, with 5 months left to go til little Pipsqueak arrives, it’s time to get cracking on the baby prep. Here’s a little sneak peek of the nursery plan…

nurserymoodboard

Bathroom Reno: Stage 5- The Tile!

So, it’s about time I show some photos of this tile, huh? Especially since it’s been done for…well, you don’t want to know. Let’s just say it’s been done for a while now!

I’m not going to do an entire instructional post on how to tile (Young House Love and Bower Power both have great posts already), but I am gonna throw out a few tips and tricks.

1. Get a good quality mortar. It’s worth it to spend a few extra bucks and not have to re-do the whole project when the mortar cracks/doesn’t stick well enough. (I’ve heard horror stories!)

2. Make sure if you number your tiles, you do it on the BOTTOM. If you number them on the top, the wax pencil marks bleed when it gets wet. And, even though you think you get it all cleaned up before you grout, you don’t, and then it gets all in your grout…I may or may not be speaking from experience. If you mark on the bottom, it never gets seen or dealt with again.

3. Get good spacers. Not the cheapo X ones that you have to peel out with a tool. No, go to Lowe’s and get Tavy tile spacers. They are easy to put in, don’t get shifted around, much easier to get out, and reusable!

4. Don’t freak out about the time limit on the mortar. We were trying so hard to stay in that 30 minute time window that we were making all kinds of mistakes at first. In the end, it took us over 3 hours to tile and the mortar was only starting to get thick at the end. You can always go back and mix up more, but it’s hard to correct mistakes after you lay the tile! So, just relax and get in a groove.

5. Make sure you get the right kind of mortar for the grout. White mortar works best with light color grout, and gray mortar with dark-colored grout. The mortar color can bleed through the grout and if you have a light-colored grout with gray mortar, it’ll darken and dull the color of the grout, and vice versa.

6. Be extremely consistent with how you lay and spread the mortar. I got to where i would do 3 scoops of mortar for each tile, and always spread the mortar with the trowel at a 45 degree angle. This made it a whole lot easier to get the tiles level once they were laid.

5. Don’t buy Home Depot grout. Ever. I love that store, don’t get me wrong, but the Custom Blend grout is no good. The color doesn’t hold and it either winds up blotchy or just a LOT lighter than it was supposed to be. Don’t believe me? Do a quick Google search. Then come back and thank me for warning you. 🙂

8. Get all the grout haze off of the tile that you can with the water and sponge, but don’t freak out if there is still a little haze left (I think it’s impossible for there not to be!). Grab a roll of dry paper towels and go to town buffing the tile. The haze will come off like powder. Or magic. Powdery magic.

9. Don’t forget to read the directions on everything 10 times before you start! You might think you read it right, but go ahead and check. There’s no recovering from mixing too much water into the mortar or waiting 4 hours before you grout instead of 24, etc.

10. Seal that grout! You worked soooo hard to make your purdy new floor, don’t let it get stained! It’s amazing how things that would typically make permanent stains comes straight off the grout with a damp paper towel once the grout has been sealed.

So are we ready for some pictures? Yes?!

Here are some in-process photos.

DSC09689

DSC09700

DSC09805

DSC09806

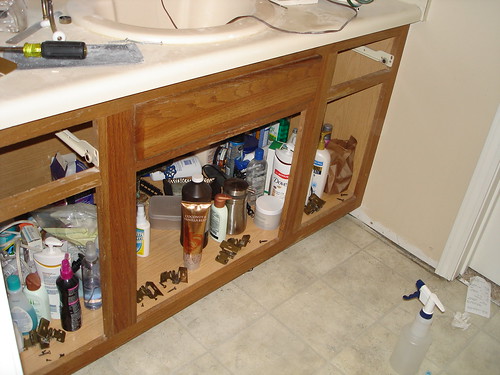
Now let’s take a look at the old floor (this is the best photo I have of the vinyl…don’t get distracted by the messy cabinet!

DSC09590

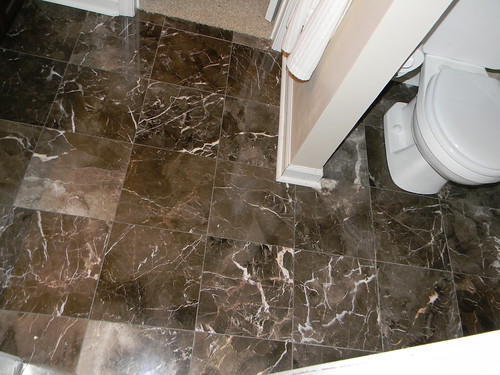
And here’s the new tile with grout and moulding.

tile1

tile2

Hooray! So much better!

Anyone got any good tiling tips to add? We love us some DIY advice!

P.S. I am totally willing to share more information on tiling to any other novice tilers out there. Let me know any questions you have – first time tiling can be scary!

Shootin’ Pretty

We have a new member of the famiy! No, nothing that exciting….we got a camera! You see, the one we had been using is something around 7 years old and barely functional. As in, it takes about 30 seconds after you press the button for it to actually take the picture. And the pictures weren’t very good. Yeah, it was time for an upgrade.

Now we are no photography experts. In fact, we are beyond novices. Chris and I are both artistic in lots of other ways, but photography is not a strong suit. Nor do we know the first thing about operating a manual camera (though we were tempted by the digital SLR’s). So, here’s the verdict: we need a camera, it needs to be cheap, and it needs to take half decent pictures without any real help from us.

Enter: the Nikon Coolpix L110

nikon

Not only does it meet our basic requirements but it actually allows you to change a few settings manually on it and has 15x superzoom. Sweet. And the best part? It cost a whopping $230 (on sale at Best Buy). Oh, yes.

So, what I’m saying is, expect some more pretty (I hope!) pictures on this site….which means more regular updating. I need accountability people! I have so much to update on that it’s overwhelming.

So I will leave you with a hint of what we spent 15 hours doing last weekend, and entire week prepping before that.

DSCN0027

Yes, my heel has been brown since Saturday.

Bathroom Reno: Stage 4 – Prepping the Floor

Well, the last update about the bathroom…a long time ago…was about our painted toilet (which is still holding up fantastically, thank goodness!). The next step in the renovation was what we were dreading the most…the floor.

Neither of us had ever tiled before and we knew starting out with natural stone was going to be a challenge. I totally understand now why the labor costs so much to have someone professionally install tile. They earn every penny! Not that that makes us willing to hire out the work…no, we are suckers for punishment. Anyway, here’s how to take a floor from regular ol’ sheet vinyl to gorgeous marble tiles in 10 steps.

Sidenote: Our house is on a concrete slab. The prep work will be much different for a house on a crawlspace or basement!

1) Look long and hard at your current floor. Think of how much work it’s gonna be to take that up and tile it. Then think about how much you’re gonna love that new floor. Put on some tunes, it lessens the pain!

2) Start scraping the vinyl off the floor. This is the worst part in my opinion. That vinyl was clinging on to the slab for dear life! After trying numerous tools and vinyl adhesive remover, we settled on boiling water and a small metal hand scraper. About 8 hours and a veeeery sore hand later, most of it was up.

DSC09639

DSC09643

3) Fill any cracks in the concrete with concrete repair caulk.

4) Check to see if your concrete is level. Take the longest level or straight board you have, lay down on the floor, and see if there are any gaps bigger than 1/4 inch in the concrete. If so, you will have to level it before putting down tile. Very slow grades in the concrete are ok, its the more abrupt ones that will cause issues. Think about standing on a tile where one corner is not supported by the floor beneath it…major cracking…and the last thing you want after doing all that work is a broken tile from the uneven subfloor! If you do have some unlevel spots, then…

5) Prime the concrete in the unlevel areas. They sell latex primer that goes with the concrete leveler found in the flooring section of any hardware store. The latex primer assures that your concrete leveler will stick to the floor. It also helps the leveler not soak in to the porous concrete so that the leveler doesn’t wind up being an unlevel surface itself.

6) Level the concrete. Now you just mix the concrete leveler with water, pour some on to the unlevel areas, and spread it around with a trowel til it’s pretty evenly spread. It will do the rest of the work for you.

DSC09684

DSC09685

DSC09686

7) Lay out your tile. In such a small area, we knew we were going to have to do a lot of cutting for the edges. Plus, with marble, every tile is different, so you want to make sure you get to pick and choose which tiles you want to use where depending on their color and how they look next to each other. Make sure you use your tile spacers here so that your cuts are accurate.

DSC09689

8 ) As you are picking up your tile,  number the bottom of your tile with a sharpie or wax pencil and number the associated spot on the floor with the same number. This is a life saver down the road when you are putting them back in place.

DSC09696

DSC09693

9) Cut the tile. We bought a $80 wet tile saw from Home Depot that has worked great for us. Don’t settle for tile nippers or a tile scorer thinking that it will turn out looking professional. It’s worth it in time and the finished product to get the wet tile saw…or, even better, borrow one!

10) Sit back, pop a cold one, and call it good for the day (all the prep actually took us closer to 5 days with all the dry time in between the primer and leveler). Next up is the actual tiling!

We’ve been mentioned!

We Can Make That was mentioned on a list of 50 must-visit DIY blogs. We are sooo honored, especially to be on a list with blogs like Young House Love, The Lettered Cottage, Bungalow 23, and many other well-known and highly respectable blogs. Thanks to homeownersinsurnace.org for the mention, it made our day!

http://www.homeownersinsurance.org/50-do-it-yourself-blogs-diy-must-reads-for-home-improvement-projects/

Bathroom reno: Stage 3- A Painted Throne

Yes, I am finally updating again about the bathroom! The good news is we are able to use the master bathroom again. The bad news is that it still isn’t completely done and probably won’t be for a little while. But we have made a lot of progress and I have quite a lot of updating to do!

That being said, let’s talk about the best seat in the house.

My advertising courses in college solidified in my head to never show pictures of toilets. Well, today, I’m blowing that out of the water! I feel like such a rebel.

Here’s a pic of our bathroom when we first bought the house.

DSC08575

Of course, I immediately changed out the toilet seat, but it was still an ecru toilet…which blended right in with the walls, the shower, the countertop, the sink, the floor…but let’s not revisit the past, right? Moving on.

So, when we were gearing up for our bathroom reno, we knew something had to be done about the toilet to truly polish off the look of the bathroom. It seems like the only logical solution would be to replace the toilet.  But then I got thinking….see, I’m a little bit of a paint-a-holic, or paint crazy, if you will. I have a reputation of painting…well, everything. And, frankly, a new toilet didn’t fit in our budget for the bathroom makeover. But surely I’m not crazy enough to paint a toilet, right?

Yep, we painted it. I did some research via my bff Google and found a bunch of this, this, and this. Kinda scary, and not exactly what I was going for. All in all, I wasn’t finding anything out there on painting your entire toilet a different color. Am I really the only person out there crazy enough to do this? Apparently so! Anyway, in all my research, I came across this:

DSC09632

Rustoleum Tub and Tile Refreshing Kit. Not exactly made for toilets, but it’s an epoxy glaze intended for use on porcelain, cast iron, etc. For the price of $30, I decided it was worth a shot. Best case scenario: I get a brand-new looking toilet with the same great functionality for $30. Worst case: I lose $30, several hours of time, and the opportunity cost of $30 that would have been spent on a new toilet. Oh yeah, and it would be hard to find someone else that would want to use a perfectly functional, but very strange-looking toilet, so there would most likely be waste involved as well. We decided to go for it.

DSC09633

DSC09634

I’ll be honest, the process was not as easy as it sounded. The fumes were HORRIBLE- much worse than I’ve ever experienced with any other refinishing product and it was difficult to get the glaze to go on smoothly. 5 hours and 3 coats later, we decided that we were done and we would wait to see how it turned out ( hoping the glaze would smooth out and look more even). It takes 3 days to fully cure, so we turned on the bathroom vent, closed the door to the master bedroom, and parked it in one of the guest rooms for a couple of nights. 3 days later,when we went to check on it, we still weren’t sure. In fact, I was pretty certain that it was a failure and we would be buying a new toilet. But we chugged on with the bathroom makeover and decided to make the final call when we were ready to re-install the toilet.

*Insert a lot bathroom reno progress here (to be posted shortly)*

I was so surprised and shocked when we put the toilet back in place and it looked good! The toilet seat didn’t fare so well with the re-glazing (there were parts not fully covered and obvious brush strokes all over), but a quick change to a new white one did the trick. There are still a few brush strokes on the tank, but, due to the way the light hits the toilet, you can’t see them unless you really, really try. Here’s the finished product.

DSC00022

DSC00023

Would I recommend this for everyone? Not a chance. But I am super pleased with how it turned out and I would totally do it again.

Has anyone else ever painted anything that seemed un-paintable? I know I can’t be the only one out there….even though Google suggests that I am. Help me out here!

House-iversary


We closed on our very first house one year ago tomorrow. I can’t believe it’s been one whole year already. We have learned so incredibly much in that year. Before this house I had never painted a room, torn down a wall, tiled a floor, chopped down a tree, and a gazillion other things that we’ve done to this house. I had hardly any confidence in myself to begin a project and had no idea what I was doing half the time. Ok, so I still don’t know what I’m doing, but at least I’m no longer afraid to forge ahead through the muddy waters to making my vision for the house come to life.

It’s amazing how we started out with a list of 30ish things we wanted to get done and now it’s at least doubled, even as we check things off of it. I wonder if it’ll ever be completely done. I’m thinking not…and that’s good, cause I wouldn’t know what to do with myself if I wasn’t always crazily working on a project…or 2…or 3…ok, so we are in the midst of 5 big projects right now. That’s normal though, right?

house

You’ve come a long way, old friend. And you still have a long way to go. Happy House-iversary!